Highlight
Storing data is key aspect of every application out there. Learn how to use Azure Cosmos DB with .NET Core to deliver CRUD operation capabilities to application of any kind, and how to handle those operations in real time on front-end using Vue.js.
What is Cosmos DB and why should anyone use it?
Cosmos DB is one of available Azure PaaS (Platform as a Service) databases. It delivers low latency and high scalability data storage anywhere in the world. Cosmos DB is simply said a document database which stores its data in JSON format. It also has several APIs allowing for easy integration with many languages and frameworks. Those APIs include
Biggest advantage of using databases like Cosmos DB is that they will scale better than databases but also offer great ‘pay as you go’ model which means for small applications the cost is much lower than the one of full-fledged database. Of’course this doesn’t mean classic relational database should not be used, on the contrary, in some cases they are very much recommended.
Creating Cosmos DB
Creation of Cosmos DB is very easy. Few clicks in Azure Portal and developer is good to go. It is recommended that for production usage environment setup should be automated using either Azure CLI or PowerShell with use of ARM templates.
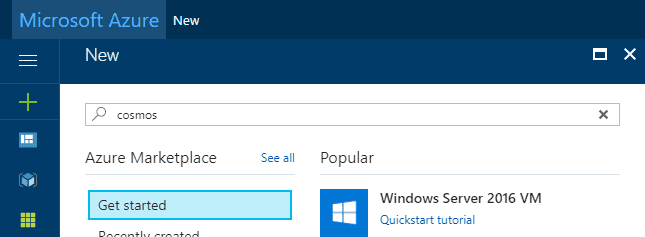
- Log into Azure Portal
- Click on plus sign on the left-hand side corner, type in cosmos is search box and then press enter
![]()
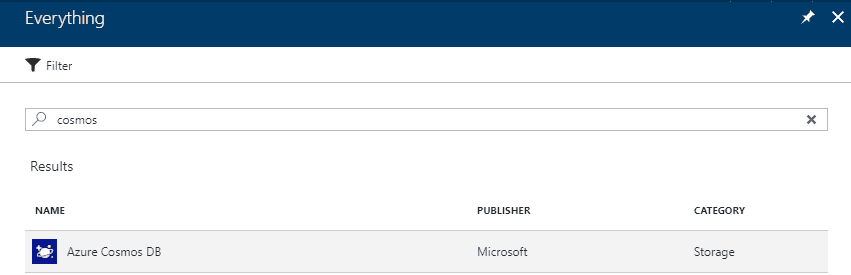
- From available list of services click on Azure Cosmos DB and press Create button
![]()
- Fill in the service details
![]()
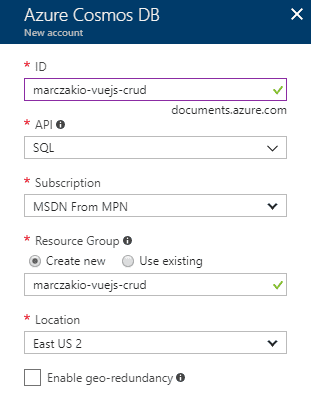
- ID - name of the service, it will be available as public DNS and therefore must be globally unique
- API - a type of connectivity for Cosmos DB, currently only one API can be enabled at the time
- Resource Group - logical container name where the resource will be created
- Location - datacenter region location
- Enable Geo Redundancy - setting which will replicate database across multiple datacenter regions
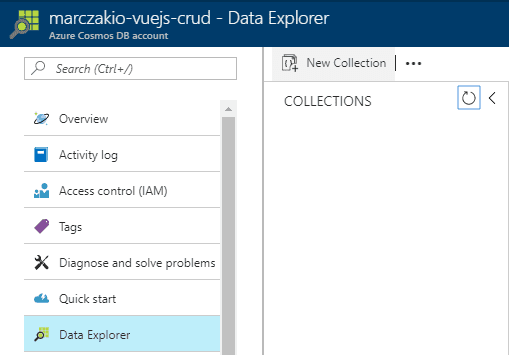
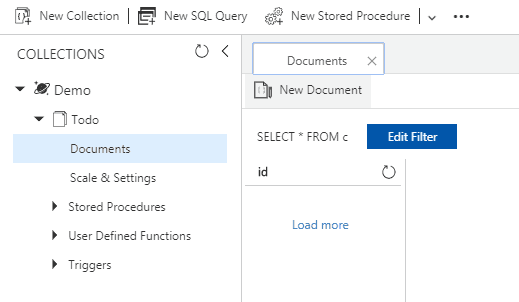
- Create new collection by navigating to Data Explorer and clicking on New Collection button
![]()
- Provide collection details and hit OK
![]()
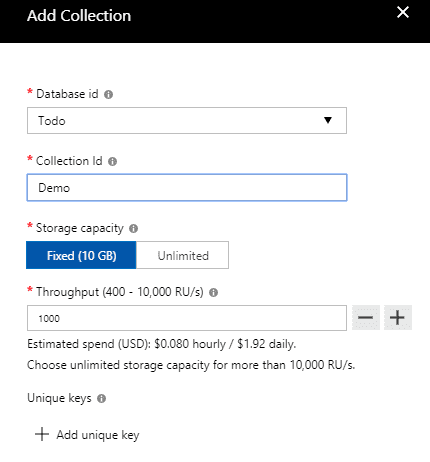
- Database Id - logical container name for collections
- Collection Id - name for the container
- Storage Capacity - how much data can the collection hold, leave it at 10GB
- Throughput - How many Request Units can collection process per second
- Unique Keys - similarly to relational database this is ‘unique’ key on the column (value). It can be also put on nested values like /Address/Id. Note that it not required to add unique key on ‘id’ column as this is enabled by default.
Summarizing
In this section
- A new Azure Cosmos DB called marczakio-vuejs-crud was created
- A new database with Id Demo was created
- A new collection with Id Todo was created
Building a Web Application
Next step is to create a web app backbone that will allow for creation of new to-do items and a web api that will handle the request.

This section will cover all 4 (four) basic actions for to-do’s which are create, read, update and delete.
Start with the web app template
This post is a follow-up to previous post Building .NET Core 2.0 web apps with Vue.js single file components using VS Code. A following template uses techniques explained in that article.
- Clone simple vuejs template by opening Command Line and executing following commands from working directory
git clone https://github.com/MarczakIO/netcore-vuejs-template.git cd netcore-vuejs-template dotnet restore npm install code . - Open .gitignore file and add following line
appsettings.local.json - Now add appsettings.local.json file inside of root directory for the project. This file will contain connection string and credentials to the database. In previous step it was added to gitignore so that it won’t be committed to the repo.
In order to get those properties for created database
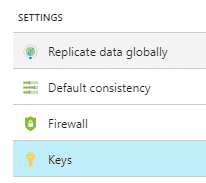
{ "DatabaseSettings": { "DatabaseId": "<created_database_id>", "Endpoint": "<cosmos_db_endpoint>", "AuthKey": "<cosmos_db_auth_key>" } } - Navigate to Keys blade on azure portal
![]()
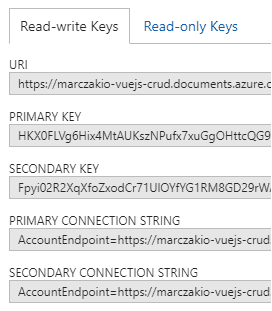
- Copy value of URI and paste it into Endpoint value and Primary Key into AuthKey inside of appsettings.local.json file
![]()
- DatabaseId is the name of the database created earlier. In case of this article the name was “Demo”
- Create folder called Models in root directory
- Add model class DatabaseSettings.cs inside of Models folder which will hold specified configuration values
using System; namespace MarczakIO.VueSPA.Web.Models { public class DatabaseSettings { public string DatabaseId { get; set; } public string Endpoint { get; set; } public string AuthKey { get; set; } } } - Now modify Startup.cs class so that it loads the options from appsettings.local.json file into a service whenever called for using dependency injection.
By configuring DatabaseOptions with Configure method every time IOptions
using System; using System.Collections.Generic; using System.Linq; using System.Threading.Tasks; using Microsoft.AspNetCore.Builder; using Microsoft.AspNetCore.Hosting; using Microsoft.Extensions.Configuration; using Microsoft.Extensions.DependencyInjection; using Microsoft.AspNetCore.SpaServices.Webpack; using System.IO; using Microsoft.AspNetCore.Http; using MarczakIO.VueSPA.Web.Models; namespace MarczakIO.VueSPA.Web { public class Startup { public Startup(IHostingEnvironment env) { var builder = new ConfigurationBuilder() .SetBasePath(env.ContentRootPath) .AddJsonFile("appsettings.json", optional: false, reloadOnChange: true) .AddJsonFile("appsettings.local.json", optional: true) .AddEnvironmentVariables(); Configuration = builder.Build(); } public IConfiguration Configuration { get; } public void ConfigureServices(IServiceCollection services) { services.Configure<DatabaseSettings>(options => Configuration.GetSection("DatabaseSettings").Bind(options)); services.AddMvc(); } public void Configure(IApplicationBuilder app, IHostingEnvironment env) { if (env.IsDevelopment()) { app.UseDeveloperExceptionPage(); app.UseWebpackDevMiddleware(new WebpackDevMiddlewareOptions { HotModuleReplacement = true }); } app.UseDefaultFiles(); app.UseStaticFiles(); app.UseMvc(routes => { routes.MapRoute( name: "default", template: "{controller}/{action}/{id?}"); }); app.Run(async (context) => { context.Response.ContentType = "text/html"; await context.Response.SendFileAsync(Path.Combine(env.WebRootPath,"index.html")); }); } } }is called in any constructor in the application a dependency injection container will make sure to initialize that property. Additionally because a configuration object has been given appsetings.local.json as additional config file then each time dependency injection initializes object all properties will be automatically populated with values from json file
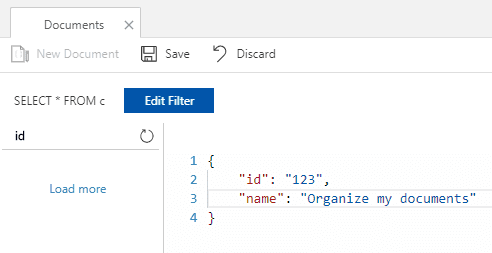
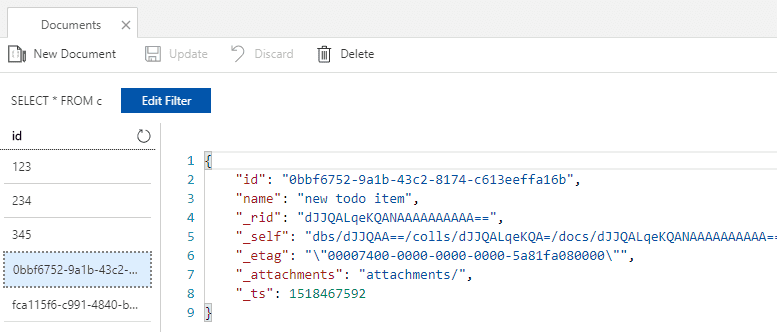
Reading documents
Order of which actions developer builds first is not of high importance although usually it’s best to start with create or read actions. In this article read action will be built first as it’s possible to create document objects in azure portal. It will also make it much easier to work with other methods when it’s possible to see results immediately.

Build a Web API for document reading
- Add nuget package for CosmosDB by using following command from command line
Note: Sometimes it is required to restart Visual Studio Code to pick up new packages or it will report namespacing issues.
dotnet add package Microsoft.Azure.DocumentDB.Core dotnet restore - Create folder called Azure in root directory
- Add new class file called DocumentDBRepository.cs
using System; using MarczakIO.VueSPA.Web.Models; using Microsoft.Extensions.Options; using Microsoft.Azure.Documents; using Microsoft.Azure.Documents.Client; using System.Threading.Tasks; using System.Collections.Generic; using Microsoft.Azure.Documents.Linq; using System.Linq.Expressions; using System.Linq; namespace MarczakIO.VueSPA.Web.Azure { public class DocumentDBRepository<T> where T : class { private DatabaseSettings dbOptions; private DocumentClient client; public DocumentDBRepository(IOptions<DatabaseSettings> _dbOptions) { dbOptions = _dbOptions.Value; client = new DocumentClient(new Uri(dbOptions.Endpoint), dbOptions.AuthKey); } public async Task<IEnumerable<T>> GetItemsAsync( string CollectionId, Expression<Func<T, bool>> predicate) { IDocumentQuery<T> query = client.CreateDocumentQuery<T>( UriFactory.CreateDocumentCollectionUri(dbOptions.DatabaseId, CollectionId), new FeedOptions { MaxItemCount = -1, EnableCrossPartitionQuery = true}) .Where(predicate) .AsDocumentQuery(); List<T> results = new List<T>(); while (query.HasMoreResults) { results.AddRange(await query.ExecuteNextAsync<T>()); } return results; } } } - Initialize depdendency injection for DocumentDBRepository inside of Startup.cs class file in ConfigureServices method
Note: Remember to add using MarczakIO.VueSPA.Web.Azure
public void ConfigureServices(IServiceCollection services) { services.Configure<DatabaseSettings>(options => Configuration.GetSection("DatabaseSettings").Bind(options)); services.AddSingleton(typeof(DocumentDBRepository<>), typeof(DocumentDBRepository<>)); services.AddMvc(); } - Create folder called Controllers in root directory
- Now it’s just a controller for Web API that is missing, so add it inside of Controllers folder called TodoController.cs
using System;
using System.Collections.Generic;
using System.Linq;
using System.Threading.Tasks;
using MarczakIO.VueSPA.Web.Azure;
using Microsoft.AspNetCore.Mvc;
using Microsoft.Azure.Documents;
using Newtonsoft.Json;

namespace MarczakIO.VueSPA.Web.Controllers
{
    [Route("api/[controller]")]
    public class TodoController : Controller
    {
        private DocumentDBRepository<Todo> todoRepo;
        private string CollectionId = "Todo";
        public TodoController(DocumentDBRepository<Todo> _todoRepo)
        {
            todoRepo = _todoRepo;
        }

        [HttpPost("[action]")]
        public async Task<Todo> GetAll([FromBody] Todo todo)
        {
            return await todoRepo.CreateItemAsync(CollectionId, todo);
        }

        public class Todo
        {
            [JsonProperty("id")]
            public string Id { get; set; }
            [JsonProperty("name")]
            public string Name { get; set; }
        }
    }
}
Build front-end for document creation
- Create new folder called Services inside of App folder
- Add new file called TodoService.js inside of Services folder
export default { getAll: () => { return fetch('/api/Todo/GetAll', { method: 'get', headers: {'Content-Type': 'application/json'} }).then(function (response) { return response.json(); }).then(function (response) { return response; }); } } - Modify TodoList.vue file inside of App/Components/Todo folder
<template> <div> <div v-if="!isFetching"> <div class="ui animated relaxed list" v-if="todos.length"> <TodoListItem class="item" v-for="todo in todos" :key="todo.id" :todo="todo" @remove="removeTodo" /> </div> <div v-else class="ui message info"> <i class="ui icon info"></i> There are no todo items. Add a new todo in the input above. </div> </div> <div v-else class="ui clean segment empty-loader"> <div class="ui active inverted dimmer"> <div class="ui loader"></div> </div> </div> </div> </template> <script> import BaseInputText from './BaseInputText.vue' import TodoListItem from './TodoListItem.vue' import TodoService from '../../Services/TodoService.js' let nextTodoId = 1 export default { components: { BaseInputText, TodoListItem }, data () { return { newTodoText: '', todos: [], isFetching: true } }, methods: { addTodo () { }, removeTodo (todoToRemove) { }, getTodos() { this.isFetching = true TodoService .getAll() .then((data) => { this.todos = data; this.isFetching = false }); } }, created () { this.getTodos(); } } </script> <style lang="scss"> .clean.segment { border: 0px; box-shadow: none; } .empty-loader { min-height: 100px; } </style> - Modify TodoListItem.vue file inside of App/Components/Todo folder. This will format list nicely as it is mostly UI change with only logic change being emit function which now returns entire object to delete instead of just id.
<template> <div class="item ui clean segment"> <div class="ui inverted dimmer" v-bind:class="{ active: todo.isUpdating }"> <div class="ui loader"></div> </div> <div class="right floated content"> <button class="ui button mini" @click="$emit('remove', todo)"> <i class="remove icon"></i> Delete </button> </div> <i class="large tasks middle aligned icon"></i> <div class="content"> <h3 class="header">{{ todo.name }}</h3> </div> </div> </template> <script> export default { props: { todo: { type: Object, required: true } } } </script> - Modify index.html inside of wwwroot folder. This will add some CSS for nicer looks. Using Semantic UI is personal choice, bootstrap or any other CSS library is also good.
<html> <head> <meta charset="utf-8" /> <meta name="viewport" content="width=device-width, initial-scale=1.0" /> <title>My App</title> <base href="/" /> <link rel="stylesheet" href="https://cdnjs.cloudflare.com/ajax/libs/semantic-ui/2.2.14/semantic.min.css" /> <link rel="stylesheet" href="/dist/site.css" /> </head> <body> <div id='app'>Loading...</div> <script src="https://code.jquery.com/jquery-3.1.1.min.js" integrity="sha256-hVVnYaiADRTO2PzUGmuLJr8BLUSjGIZsDYGmIJLv2b8=" crossorigin="anonymous"></script> <script src="https://cdnjs.cloudflare.com/ajax/libs/semantic-ui/2.2.14/semantic.min.js"></script> <script src="/dist/main.js"></script> </body> </html> - Run the project. This is what should be displayed on the screen.


Creating documents
Now that the reading and displaing data is done. Creation of new documents can be quickly added.

Build a Web API for document creation
- Add new method CreateItemAsync to class file DocumentDBRepository.cs
public async Task<T> CreateItemAsync(string CollectionId, T item) { Document document = await client.CreateDocumentAsync( UriFactory.CreateDocumentCollectionUri(dbOptions.DatabaseId, CollectionId), item); return (T)(dynamic)document; } - Add new method Create inside of Controllers folder called TodoController.cs
[HttpPost("[action]")]
public async Task<Todo> Create([FromBody] Todo todo)
{
    return await todoRepo.CreateItemAsync(CollectionId, todo);
}
Build front-end for document creation
- Modify BaseInputText.vue inside of App/Components/Todo folder
<template> <div> <h2>Create new todo item</h2> <div class="ui vertical segment"> <div class="ui inverted dimmer" v-bind:class="{ active: isCreating }"> <div class="ui loader"></div> </div> <input type="text" class="input" :value="value" v-on="listeners"/> </div> </div> </template> <script> export default { props: { value: { type: String, default: '', }, isCreating: { type: Boolean, default: false } }, computed: { listeners () { return { ...this.$listeners, input: event => this.$emit('input', event.target.value) } } } } </script> <style lang="scss" scoped> @import './App/variables.scss'; .input { width: 100%; padding: 8px 10px; border: 1px solid $vue-blue; } </style> - Modify TodoList.vue inside of App/Components/Todo folder
<template> <div> <div v-if="!isFetching"> <BaseInputText v-model="newTodoText" placeholder="New todo item" @keydown.enter="addTodo" :isCreating="isCreating" /> <div class="ui animated relaxed list" v-if="todos.length"> <TodoListItem class="item" v-for="todo in todos" :key="todo.id" :todo="todo" @remove="removeTodo" /> </div> <div v-else class="ui message info"> <i class="ui icon info"></i> There are no todo items. Add a new todo in the input above. </div> </div> <div v-else class="ui clean segment empty-loader"> <div class="ui active inverted dimmer"> <div class="ui loader"></div> </div> </div> </div> </template> <script> import BaseInputText from './BaseInputText.vue' import TodoListItem from './TodoListItem.vue' import TodoService from '../../Services/TodoService.js' let nextTodoId = 1 export default { components: { BaseInputText, TodoListItem }, data () { return { newTodoText: '', todos: [], isFetching: true, isCreating: false } }, methods: { addTodo () { this.isCreating = true var todoname = this.newTodoText.trim(); if (todoname) { var todo = {"name": todoname} TodoService .create(todo) .then((data) => { this.todos.push(data); this.isCreating = false this.newTodoText = ''; }); } else this.isCreating = false; }, removeTodo (todoToRemove) { }, getTodos() { this.isFetching = true TodoService .getAll() .then((data) => { this.todos = data; this.isFetching = false }); } }, created () { this.getTodos(); } } </script> - Modify TodoService.js inside of App/Services folder by adding new create function
create: (item) => { var data = JSON.stringify(item); return fetch('/api/Todo/Create', { method: 'post', headers: {'Content-Type': 'application/json'}, body: data }).then(function (response) { return response.json(); }).then(function (response) { return response; }); } - Test the application
Deleting documents
To get application fully functional a deletion operation must be created next.

Build a Web API for document deletion
- Add new method DeleteItemAsync to class file DocumentDBRepository.cs
public async Task DeleteItemAsync(string CollectionId, string id) { await client.DeleteDocumentAsync( UriFactory.CreateDocumentUri(dbOptions.DatabaseId, CollectionId, id)); } - Add new method Delete inside of Controllers folder called TodoController.cs
[HttpPost("[action]")]
public async Task Delete([FromBody] Todo todo)
{
    await todoRepo.DeleteItemAsync(CollectionId, todo.Id);
}
Build front-end for document creation
- Modify removeTodo function inside of TodoList.vue inside of App/Components/Todo folder
removeTodo (todoToRemove) { this.$set(todoToRemove, 'isUpdating', true); TodoService .delete(todoToRemove) .then((data) => { this.todos = this.todos.filter(todo => { return todo.id !== todoToRemove.id }) this.$set(todoToRemove, 'isUpdating', null); }); }, - Modify TodoService.js inside of App/Services folder and add new delete function
delete: (item) => { var data = JSON.stringify(item); return fetch('/api/Todo/Delete', { method: 'post', headers: {'Content-Type': 'application/json'}, body: data }).then(function (response) { return response; }); } - Test the application

Modifying documents
Last operation is item modification. This example will show inline editing but for larger apps it is advised to create dedicated screen or popup.

Build a Web API for document deletion
- Add new method UpdateItemAsync to class file DocumentDBRepository.cs
Note: It is possible to simplify this function by creating base type for type T which contains property Id and specify this in class declaration as a constraint. This way id parameter does not have to be passed explicitly but could be used from type T.
public async Task<T> UpdateItemAsync(string CollectionId, string id, T item) { Document document = await client.ReplaceDocumentAsync( UriFactory.CreateDocumentUri(dbOptions.DatabaseId, CollectionId, id), item); return (T)(dynamic)document; } - Add new method Update inside of Controllers folder called TodoController.cs
[HttpPost("[action]")]
public async Task<Todo> Update([FromBody] Todo todo)
{
    return await todoRepo.UpdateItemAsync(CollectionId, todo.Id, todo);
}
Build front-end for document creation
- Modify file TodoList.vue inside of App/Components/Todo folder
<template> <div> <div v-if="!isFetching"> <BaseInputText v-model="newTodoText" placeholder="New todo item" @keydown.enter="addTodo" :isCreating="isCreating" /> <div class="ui animated relaxed list" v-if="todos.length"> <TodoListItem class="item" v-for="todo in todos" :key="todo.id" :todo="todo" @remove="removeTodo" @modify="modifyTodo" /> </div> <div v-else class="ui message info"> <i class="ui icon info"></i> There are no todo items. Add a new todo in the input above. </div> </div> <div v-else class="ui clean segment empty-loader"> <div class="ui active inverted dimmer"> <div class="ui loader"></div> </div> </div> </div> </template> <script> import BaseInputText from './BaseInputText.vue' import TodoListItem from './TodoListItem.vue' import TodoService from '../../Services/TodoService.js' let nextTodoId = 1 export default { components: { BaseInputText, TodoListItem }, data () { return { newTodoText: '', todos: [], isFetching: true, isCreating: false } }, methods: { addTodo () { this.isCreating = true var todoname = this.newTodoText.trim(); if (todoname) { var todo = {"name": todoname} TodoService .create(todo) .then((data) => { this.todos.push(data); this.isCreating = false this.newTodoText = ''; }); } else this.isCreating = false; }, modifyTodo (todo, todoText) { this.$set(todo, 'isUpdating', true); TodoService .update(todo, todoText) .then((data) => { this.$set(todo, 'isUpdating', null); var index = this.todos.findIndex(todo => { return todo.id === data.id }); this.$set(this.todos, index, data); }); }, removeTodo (todoToRemove) { this.$set(todoToRemove, 'isUpdating', true); TodoService .delete(todoToRemove) .then((data) => { this.todos = this.todos.filter(todo => { return todo.id !== todoToRemove.id }) this.$set(todoToRemove, 'isUpdating', null); }); }, getTodos() { this.isFetching = true TodoService .getAll() .then((data) => { this.todos = data; this.isFetching = false }); } }, created () { this.getTodos(); } } </script> <style lang="scss"> .clean.segment { border: 0px; box-shadow: none; } .empty-loader { min-height: 100px; } </style> - Modify TodoListItem.vue inside of App/Components/Todo folder
<template> <div class="item ui clean segment"> <div class="ui inverted dimmer" v-bind:class="{ active: todo.isUpdating }"> <div class="ui loader"></div> </div> <div class="right floated content"> <button class="ui button mini" v-bind:class="{ blue: !isEditing }" @click="isEditing = !isEditing"> <i class="edit icon"></i> <span v-if="!isEditing">Edit</span> <span v-else>Stop editing</span> </button> <button class="ui button mini red" @click="$emit('remove', todo)"> <i class="remove icon"></i> Delete </button> </div> <i class="large tasks middle aligned icon"></i> <div class="content"> <p class="header">{{ todo.name }}</p> </div> <div class="ui input" v-if="isEditing"> <input type="text" class="ui input" v-model="newTodoText" @keydown.enter="modifyTodo"/> </div> </div> </template> <script> import BaseInputText from './BaseInputText.vue' export default { components: { BaseInputText }, props: { todo: { type: Object, required: true } }, data () { return { newTodoText: '', isEditing: false } }, methods: { modifyTodo () { this.$emit('modify', this.todo, this.newTodoText); this.newTodoText = ''; } } } </script> <style> .input { margin-top: 5px; width: 100%; } </style> - Modify TodoService.js inside of App/Services folder and add new update function
update: (item, newValue) => { var updateItem = { ...item, name: newValue } var data = JSON.stringify(updateItem); return fetch('/api/Todo/Update', { method: 'post', headers: {'Content-Type': 'application/json'}, body: data }).then(function (response) { return response.json(); }).then(function (response) { return response; }); } - Test the application